Calibration Certificates

In precision measuring instruments and metrology, ACCURACY and RELIABILITY are important aspects to users. Decisions taken following inaccurate readings from instruments would result in unintended consequences. Digi-Pas® Precision Digital Levels and Inclinometers are calibrated for non-linearity in wide-range operating temperature utilizing company's proprietary advanced calibration and manufacturing processes. To enhance transparency, ensure impartiality and competence, Digi-Pas® product's accuracy performance has been externally verified by numerous accredited world-leading certification bodies employing ultra-high precision nanotech turning machines and angular Interferometers traceable to NIST, JIS, UKAS & DIN standards.
Calibration Certificates on Digi-Pas® product conformity assessments are obtained from independent accredited third parties and world-leading National Metrology Laboratories under Bureau International des Poids et Mesures (CIPM MRA). Digi-Pas® products' ACCURACY performance are tested to specification and periodically re-validated by numerous accredited third parties Calibration & Test Laboratories in USA, Japan, UK and Germany traceable to NIST, JIS, UKAS & DIN ensuring the acceptance of conformity assessments all over the world.
Production equipment and angular test instruments in our factory are periodically calibrated to our research laboratory precision angular measuring equipment, which in turn laterally re-validated against external 3rd parties independent certification standards in U.S., Japan, Germany and UK (see below samples of Calibration Certificate with DATA). Each batch of production test data including calibration documents are maintained in accordance to ISO9001 procedures, which kept available upon request by the related parties and authority. Only those high-precision models are each accompanied with hard-copied factory QA calibration certificate with data.
Clients whom wish to have each product purchased accompanied with a hard-copied 3rd party Calibration Certificate with DATA of any product model, please contact our SALES SUPPORT TEAM for a quote. Some precision models are available WITH 3rd party calibration certificate plus DATA at Amazon.com USA.
The following samples of calibration certificate provide users with options to choose competent 3rd party Calibration Service & Test Providers near your geographical region. These Service Providers have specialized precision angular test equipment and expertise which also conform to ISO/IEC 17025:2005 and/or ANSI/NCSL Z540 standard(s) to calibrate and test unique features of our products, particularly (i) 2-axis simutaneous angles measurements, (ii) very wide measurement range, and (iii) ultra-high precision. Digi-Pas® instrument's quality system ensure products manufactured conform to specification. Latest factory’s calibration certificates and/or external calibration certifications can be obtained upon request by filling the form on "Contact Us".
Calibration Certificates
Samples of Digi-Pas® Calibration Certificate and Declaration of Conformity Certificate :
| Description | Model | ||||||||||
| DWL 2000XY | DWL 3000XY | DWL 3500XY | |||||||||
| Digi-Pas® Calibration Certificate |  |
 |
 |
||||||||
| Digi-Pas® Declaration of Conformity Certificate |  |
 |
 |
||||||||
Advantages of using Digi-Pas® 2-Axis precision digital inclinometer over conventional single-axis levelling instruments:
Traditional spirit level, pendulum-based digital level and inclinometer were constrained with (i) single axis, (ii) narrow angle measurement range and (iii) large footprint/size. Single-axis inclinometer is also susceptible to cross-axis error particularly when measuring at larger angles. However, precision levelling, angle measurement, alignment and surface flatness profiling tasks essentially involve 2-dimensional plane rather than two independent orthogonal single-axis lines. Digi-Pas® 2-Axis precision inclinometer utilizing advanced MEMS technology provides simultaneous 2-axis and wide angle measuring range capabilities that traditional single-axis digital/'bubble' levels are unable to offer.

-
2-axis MEMS technology enables simultaneous 2D (X-Y plane) leveling and angles measurement instrument (i.e. pitch & roll), completely eliminates tedious trial-and-error (i.e. going back-and-forth taking reading one-axis at a time) experienced when using single-axis levels to align precision machines/objects. No costly need for owning 2 units of single-axis digital levels to do the same task as one unit Digi-Pas® dual-axis. i.e. effective & time saving. The repetitive yet monotonous trial-and-error activity of using single-axis levels is also time-consuming, non-productive and promote boredom that often succumb engineers to resort for compromising works.
-
Digi-Pas® 2-axis MEMS driven inclinometers are compensated and calibrated for non-linearity and operating temperature variation utilizing proprietary advanced manufacturing patented processes. Angular accuracy and stability performance over a very wide measurement range are externally verified by accredited 3rd party independent certification bodies traceable to NIST, UKAS, DIN & JIS. i.e. accredited & reliable. Because of its 2-axis, wide angular measuring range and vibrometer functions, Digi-Pas® inclinometer is more than just a leveling tool. It is an instrument that provides a comprehensive solution for planar angular leveling, measuring, diagnostic and alignment needs.
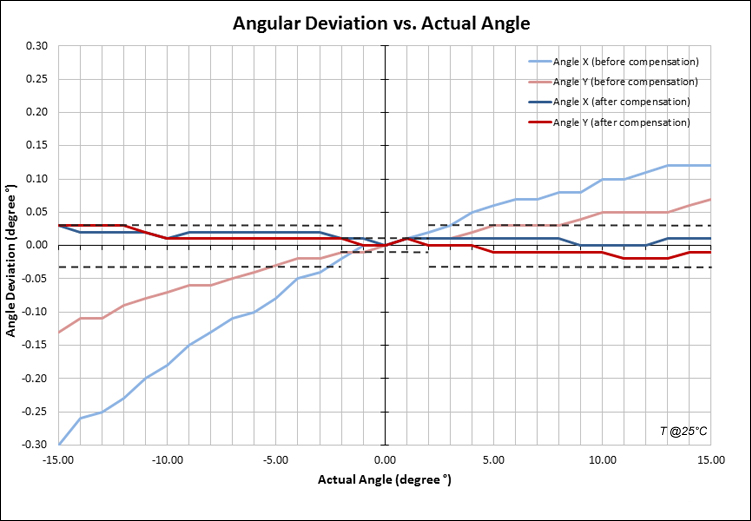

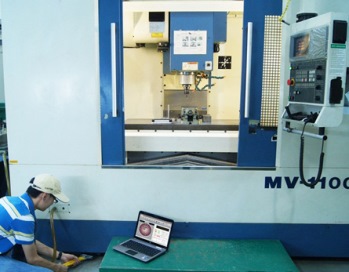
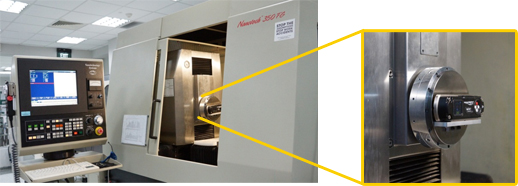
Compensating and calibrating Digi-Pas® 2-Axis Machinist Digital Level Digital Bull's Eye with numerical/graphical data and a built-in VibroMeter enable machine installer to track/guide alignment in real-time and instantly verify positional stability of the levelled/aligned machine by comparing machine's status profiles before and after setting up. Dual axis smart Bull's eye also prevents parallax error that is prone to experience when viewing the 'bubble' of a traditional spirit level, i.e. accountability & quality works.
Wireless/USB connectivity to PC/mobile device enables engineers to perform 'one-man-operation' when conducting levelling and alignment tasks, i.e. speedy & cost saving.
'One-man-operation' can be performed when levelling machine using Digi-Pas® 2-Axis precision Digital Level via wireless Bluetooth connectivity
Utilizing Digi-Pas® 2-axis inclinometer translates into speedy machine installation and productive maintenance works with professional quality that maximizes precision machine performance. Thus, leads to improved user's product quality (e.g. accuracy & yield) and higher customer satisfaction.
Digi-Pas® 2-axis digital inclinometer provides a comprehensive solution for precision levelling and angular measurement, and serves as a superior alternative that seeks to replace the use of outdated spirit levels and limited angle-measuring range of conventional single-axis digital levels.
©2026 DIGIPAS TECHNOLOGIES INC. All Rights Reserved
Precision Digital Level Accuracy and Reliability - Digi-Pas® 2-Axis Technology
In any precision measuring instruments and metrology, accuracy and reliability are very important aspects to users. Readings from an inaccurate measuring instrument/tool would result in making a faulty decision and in many cases could have unintended consequences.
Digi-Pas® 2-axis digital leveling instruments are built with advanced MEMS Sensor Technology and precisely calibrated for non-linearity for its entire measurement range using high precision computer numerical controlled equipment with resolution of 0.0001° (< 1 arcsecond). The accuracy and repeatability conformance of these highly specialized calibration equipment are further tested and periodically verified with ultra-high precision angular rotary systems (<0.01 arcsecond), as well as laterally compared against measuring data from world-leading accredited test and certification bodies in Japan, USA, UK and Germany, traceable to NIST, JIS, UKAS & DIN. Series of Calibration Certificates obtained from these certification bodies are obvious evidences of our product conformance to specification. This has demonstrated Digi-Pas® capability and its leading-edge technology to develop and manufacture world-first dual-axis high precision angular measuring instruments.

The digital technology adopted has enabled Digi-Pas® angular measuring instruments to be compensated for wide operating temperature variation utilizing Digi-Pas® patented advanced calibration processes (US Pat. No. 9,459,121 B2). Programmable precision temperature and humidity chambers are also utilized to calibrate various Digi-Pas® product lines for a range of -20°C to +60°C. This has enabled these products to reliably withstand stringent operating environment in many harsh terrains ranging from building skyscrapers in the desert of Middle-East to the constructing of oil pipes, tunnels and bridges in the freezing cold countries such as Canada, the Nordic and Russia.
-
Characterizing Digi-Pas® 2-Axis High Precision Digital Level
It is well known that a typical characteristic of MEMS tilt sensor inherently contents nonlinearity within its angular measuring range at any fixed operating temperature as well as when temperature changes. These nonlinearities affect angular instrument accuracy becomes even more significant when dealing with ultra-precision angular measuring system. Digi-Pas® employs our proprietary calibration processes utilizing advanced calibration technologies to stabilize multiple variables contributed by material properties, components and electronic system. Hysteretic nonlinearity and cross-axis error have been controlled and managed to a level negligible or within product’s specification.
-
Calibration and Testing of 2-Axis Precision Digital Level and Inclinometer
Calibration and testing of precision angular measuring instrument become very challenging at higher precision, wider measuring range and multi-axis. Test equipment’s linearity compounding error within entire measuring range and testing processes such as Swash errors become major impediments for establishing a responsible budget on measuring system uncertainties of no less than 95% confidence level at a coverage factory of k=2.
Over the years, Digi-Pas® has relentlessly made continuous improvements and closely collaborated with global leading 3rd party accredited test laboratories in USA, Japan, UK & Germany and world-leading National Metrology Institutes under Bureau International des Poinds et Mesures (CIPM MRA) to successfully test and verify with rigor our products performances to specification traceable to NIST, JIS, UKAS & DIN for international conformity assessments. These collaboration and cooperation have benefited many of our users in USA, EU and Asia to conveniently sending their instruments for annual calibration and test at a nearby laboratory for shorter lead-time and lower cost as these labs are in a close proximity to their respective geographical location.

Digi-Pas® Calibration equipment – Micrometer Sine Bar Digi-Pas® patent (US Pat. No. 9,459,121 B2) on methods and apparatus for calibrating ultra-precision 2-axis simultaneous angular instrument (of < 1.0 arcsec accuracy) utilizing nano-technology equipment addresses and resolves critical limitations and shortcomings inherent when using conventional single-axis rotary table or laser interferometer to calibrate and test dual-axis precision digital anglular measuring instrument by taking one axis at a time.
-
Utilizing the "Absolute Level Setting" to Set Reference Level Point to Earth Datum
In leveling applications, the primary aim is to align the surface plane of a physical object such as a machine, equipment or engineering structure to a reference leveling point, commonly known by tradesmen as ‘zero level’. This ‘reference level point’ is a planar position tangent to the center gravity of earth i.e. refers as Earth Datum. This ‘reference level point’ can then be transferred into a leveling instrument. Subsequently, this leveling instrument is used by industrial engineers to set a particular machine/object surface to a required leveling position. The process of transferring Earth Datum to a Digi-Pas® digital leveling instrument is referred as performing "Absolute Leveling Setting". By performing Absolute Level Setting on Digi-Pas® digital levels, it also effectively removes any offset resides in the instrument and thus resetting the instrument’s reference leveling point to coincide with earth datum.
Similarly, "User Self-Calibration" is another alternative process to transfer Earth Datum and automatically store the reference leveling point into a Digi-Pas® digital leveling instrument.
For further information on earth datum, please also refer to web-link: Geodetic Datum, http://en.wikipedia.org/wiki/World_Geodetic_System
-
What happen to the accuracy of Digi-Pas® leveling instrument if it drops?
Likewise to any precision measurement instrument/tool, mishandling such as dropping a digital level to the floor or storing it outside the specified temperature range, could affect its accuracy. This is due to structural deformation resulted from mechanical shock on impact when dropped and physical micro-dimensional changes (e.g. non-linearity) resulted from thermal expansion or contractions when storage temperature exceeded maximum specified range.
However, unlike traditional ‘bubble’ spirit levels and many other digital levels in the market, all Digi-Pas® digital level is built with User’s Self-Calibration feature. This feature empowers users to perform their own calibration without the need to sending to 3rd party testing laboratory for inspection when minor mishandling the device. At user’s convenient work site or field work, User’s Self-Calibration can reliably reset the Digi-Pas® digital level back to factory preset accuracy whenever in doubt with the accuracy.
For further information on Digi-Pas® digital level , please refer to FAQ at the following web-link: http://www.digipas.com/support/faq.
Three-Point Contact Base of Digi-Pas® 2-axis Precision Inclinometer
- Limitations of conventional rectangular contact base levelling instrument
The contact base surface finish quality of a typical conventional leveling instrument or inclinometer is one of the critical determinants of accuracy performance and common rectangular-shape flat surface often suffer from geometrical deviation resulting from:
Waviness and unevenness
Irregularities due to distorted or worn surface
Dust and dirt trapped or surface roughness
Figure 1 illustrates three typical poor surface finishes of conventional rectangular surface four-point contact base. The unstable surface-to-surface contact causes 'rocking' which results in measurement inaccuracy derived from inconsistent readings. A common practice to improve the outcome under such constraint is by taking more samples to obtain an averaged reading. However, this time-consuming and repetitive activity often promotes boredom that succumb engineers to resort for compromising works, especially when the instrument is located at some distance.

Figure 1: Poor surface finishes of typical levelling instrument contact base and implications Although high quality surface requires both flatness and smoothness, it is difficult and expensive to control in machining of metal alloy surface particularly when involving relatively large area. Increasing the flatness and smoothness of a few microns would usually increase exponentially on its manufacturing costs. This often results in a trade-off between the manufacturing costs of the instrument and thus compromises its accuracy performance.
In addition, the rectangular contact base surface of a conventional leveling instrument is also susceptible to target measuring surface unevenness, which is another factor affecting levelling and measurement accuracy. Figure 2 illustrates issues associated when a rectangular contact base of a traditional single-axis spirit level is placed on a typical machined surface having low frequency, long wavelength flatness variation. It is clearly shown that full and stable surface-to-surface contact could not be achieved between the instrument base and the measuring surface. The contact may cause rocking that results in measurement errors, hence affects the accuracy and reliability of the leveling outcome. E.g. a 3µm of surface unevenness along the length of a typical 20µm/m resolution spirit machinist level of 130mm would result in 0.001° error
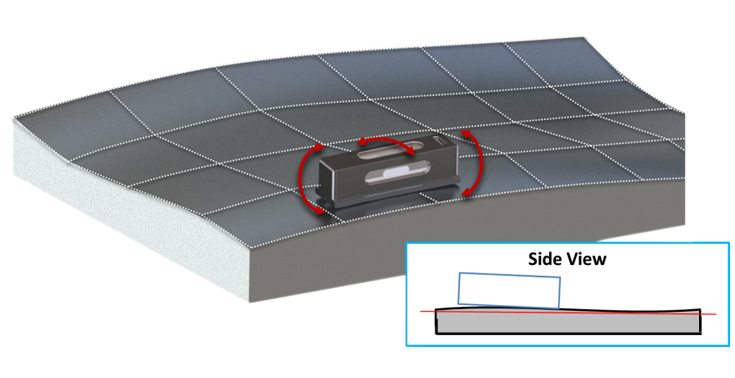
Figure 2: Conventional single-axis contact base on a two-dimensional uneven plane - Digi-Pas® concave contact base versus 'perfectly flat' contact base structures
Often, dents are easily generated on smooth metal base area of an instrument resulting from rough handling. A protruding dent formed at any location near the middle of a 'perfectly flat' metal base simply causes rocking which results in measurement error or inaccuracy. To minimize these errors, Digi-Pas® instrument metal surface base has been deliberately designed and machined to form a concave 4-points contact base specifically target to prevent rocking caused by small protruding dents or foreign particles formed at the center of device’s base. Figure 3 illustrates the inferiority of a 'perfectly flat' base of conventional instruments against the improved design of Digi-Pas® concaved 4-point base when small dents/particles exist at the center of device’s base. It is obvious that small dents or particles exist near the middle of the base shall not affect stability of Digi-Pas® instrument as it is supported by both ends having precisely machined stable contacts to the targeted measurement surface.

Figure 3. Side view of perfectly flat contact base versus Digi-Pas® concave 4-point base On the other hand, dents formed at the both ends of the instrument may not necessarily cause significant rocking. When dents happen at these both ends, an offset value/reading caused by these dents can be easily removed using Digi-Pas® calibration or Absolute Level feature (see “Accuracy Performance”). In contrast, a protruding dent formed at the middle of the device’s base destabilizes the device with severe rocking during measurement which cannot be resolved by using calibration or Absolute Level feature. This phenomenon does not only affect the instrument's initial offset value, it also affects the repeatability of measurement reading.
Thus, the contact surface approaching the base center of instrument is deliberately being designed with a concave profile to minimize the above issue, providing improved stability of measurement readings as well as enhances accuracy of the instrument.
- Pioneering the application of 3-point contact base in 2-axis precision levelling instrument
In view of the constraints inherent in conventional contact base measuring instrument described in the foregoing, Digi-Pas® pioneered and patented the utility of 3-point contact base for its 2-axis precision angular and surface flatness measurement instruments. The triangular shape of 3-point contact base seeks to address the shortcomings associated with conventional rectangular contact base.
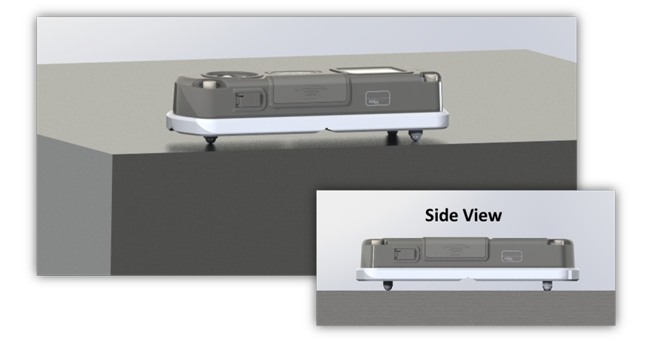
Figure 4: Stable 3-point-to-surface contact between Digi-Pas® inclinometer and flat surface object 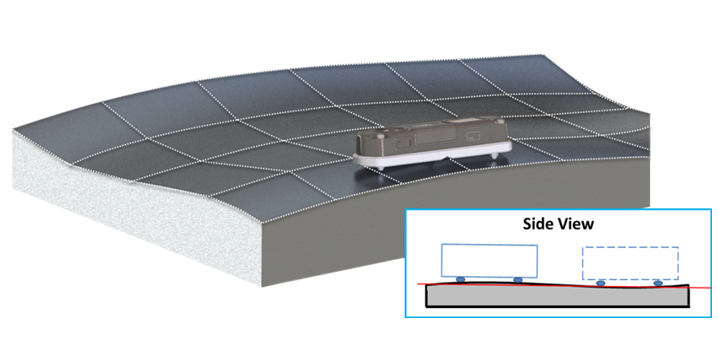
Figure 5: Stable 3-point-to-surface contact between inclinometer and uneven surface When a 3-point contact base leveling instrument is placed on either flat or uneven surface object (e.g. typically machined metal surface) as shown in figure 4 and 5 respectively, the three-point frame serves as a triangle-plane platform for supporting the weight and maintaining the stability of the instrument. It provides maximum stability and strength against downward forces and horizontal forces as well as movements about horizontal axes. With the sturdy three-point stand, a most stable 3-point-to-surface contact can be established without rocking and thus achieving consistent leveling readings of the two-dimensional measuring surface. Any angular deviations on the surface area is detected by Digi-Pas® 2-axis inclinometer as sensitive contact points touch on a particular section of uneven surface area.
- Advantages of Digi-Pas® 3-point contact base levelling instrument
In 2009, Digi-Pas® pioneered and patented the utility of 3-points contact base to its world-first 2-axis precision digital level series that effectively prevent any surface dimensional deviation caused by unevenness of its own instrument’s metal surface contact base. Figure 5 illustrates the 3-point contact base screws made of harden steel and titanium materials that offers great stability and prevent it from ‘rocking’ when placed on either flat or uneven smooth surface for 2D levelling and planar angular measurement.
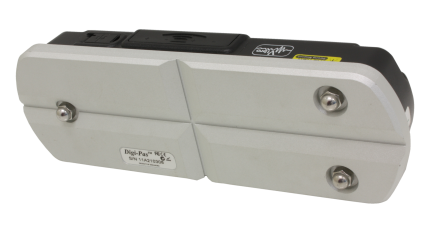
Figure 6: Digi-Pas® patented 2-Axis Precision inclinometer utilizing 3-Point Contact Base Maintaining the 3-points contact is easy, speedy and cost effective simply by replacing the harden/titanium screws whenever they wear off, saving significant amount of time and cost as compared to maintain the instrument’s contact base surface finish through standard machining. Device accuracy performance can also be re-calibrated by performing User Self-Calibration or “Absolute Level” setting at ease. Please refer to user manual for detail instructions.
For using Digi-Pas® 2-axis inclinometer to level an object having a very rough top surface, the 3-point harden/titanium screws can be temporarily removed and use the flat base surface to naturally average the rough surface. Absolute Level Setting is required to be performed immediately after changing the base to ensure the instrument maintains its reference accuracy. However, in high precision leveling, angular measurement and surface profiling tasks usually involve high quality flatness and smooth surfaces such as granite and metal alloy machined surfaces. Hence, 3-point contact base is still a better choice.


